3D Letters
Letters are a fundamental piece of a huge number, and drawing is no special case. What better method for making the letters in your drawing more imaginative by adding aspects? With 3D letters, anything you write in your drawing will look multiple times all the more tastefully satisfying!
Note: Visit the Cute Tinkerbell Drawing
Luckily, we have made a bit-by-bit instructional exercise on the most proficient method to draw 3D letters, summed up in 9 fast and simple tasks. Furthermore, every guidance accompanies a delineation, making the entire interaction significantly more straightforward for you to follow. In this aide, we will draw a three-layered letter A. Thus, feel free to set up a piece of paper and a pencil and we should begin drawing. Remember to snatch your number one shading materials as well!
Stage 1 - 3D letters drawing
Begin by drawing a three-sided shape. This figure frames the center of the letter A.
Remember that the triangle figure ought not be in the exceptional center, rather it ought to be somewhat on the right half of the middle. This guarantees that there's adequate room for the components of the letter.
Keep in mind, the size of your 3D letter relies upon the size of the triangle. The greater the triangle shape is, the greater the letter A will be.
The 3D letter basically comprises of straight lines. Thus, you might have to utilize a ruler to assist you with defining straight boundaries rapidly and without any problem.
Stage 2 - Make the Top Piece of the Letter A
Define a flat boundary over the triangle that we drew beforehand. This frameworks the highest piece of the letter A.
Remember that there ought to be a hole between the flat line and the triangle figure.
Stage 3 - Draw the Letter A's Left Inclining Line
Beginning from the left endpoint of the level line, define a descending slanting boundary making a beeline for the left.
This structures the edge of the letter An on the left side.
Stage 4 - Complete the Left Half of the Letter A
Define a short flat boundary going to the right start from the base endpoint of the slanting line that we drew beforehand.
Subsequently, define a short vertical inclining boundary somewhat shifted to the right side.
In the wake of completing this step, a big part of the letter An ought not be finished, as displayed in that frame of mind above.
Stage 5 - Next, Define the Base Center Boundary
From the top endpoint of the latest line we drew, define an even boundary. This makes the center line at the lower part of the letter A. This is likewise the line that interfaces letter A's both "legs".
Subsequently, define a descending inclining boundary marginally shifted towards the right start from the right endpoint of the even line we drew quite recently.
Stage 6 - Then, Define the Right Side Base Boundary
Define a level boundary from the base endpoint of the corner to corner line we drew beforehand. This structures the main concern of the right leg of the letter A.
Remember that this line ought to have a comparative length to the line on the contrary side, which we drew beforehand in the fourth step.
Stage 7 - Conclude the Design of the Letter A
Complete the type of the letter A by defining a corner to corner boundary, interfacing the two endpoints of the flat line at the top and at the base.
As of now, the letter An ought to now be full grown. What's more, as you can find in the delineation, the letter An is askew and arranged somewhat on the right side.
Try not to stress over this! This leaves sufficient room for the elements of the letter A.
Stage 8 - Draw the Components of the Letter A
Subsequent to finishing the construction of the letter A, we will presently be dealing with the aspects in this step.
Continue by defining lower askew boundaries at the highest part and both base pieces of the letter.
Remember that all corner to corner lines ought to be inclining towards the left side, as displayed in the outline above.
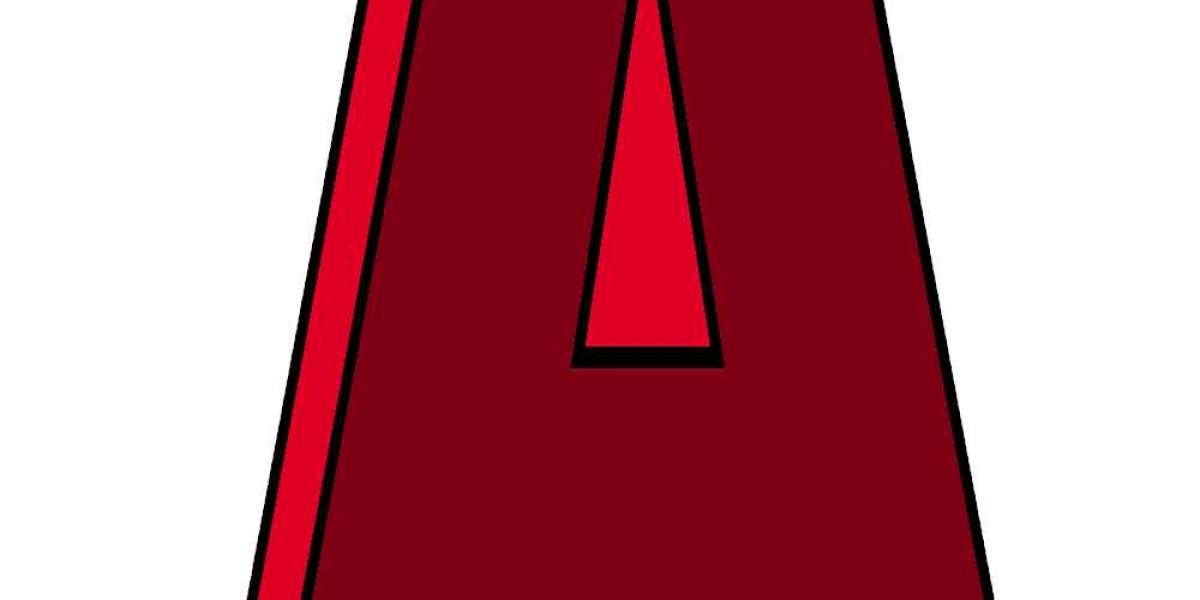
Stage 9 - Make the Letter A Three-Layered
Conclude the aspects by shutting off the figures. Go on by defining a corner to corner boundary shutting off the aspects on the left half of the letter A.
A while later, define vertical boundaries to occupy in the clear spaces at the lower part of the letter.
Right now, the components of the letter An is done. Consequently, your three-layered letter An is presently finished.
Now that we've effectively drawn a three-layered letter A, it's at last time for the most thrilling part. In this last step, we'll pick the varieties and shading our drawing.
This step is discretionary however we prescribe doing as such to make your craftsmanship bright.